

Can You Iron Patches on Leather? Yes—Use a Heat Press Machine for Perfect, Damage-Free Results
2025-12-22
Leather goods, from jackets and bags to boots and wallets, are prized for their durability, timeless style, and unique texture. Adding patches to leather items is a popular way to personalize them.
Table of Contents
- I. Introduction: The Case for Heat Press Machines in Leather Patch Application
- II. Why Household Irons Are Dangerous for Leather Patches
- III. How to Apply Patches on Leather with a Heat Press Machine (Step-by-Step)
- IV. Key Tips for Success: Expert Insights to Avoid Common Pitfalls
- V. Conclusion: Embrace the Heat Press for Perfect Leather Patches
I. Introduction: The Case for Heat Press Machines in Leather Patch Application
Personalization and customization have become central to consumer preferences, and leather items are no exception. Patches offer a versatile way to elevate leather goods—whether you’re adding a vintage band patch to a leather jacket, a company logo to a leather tote, or a decorative design to a pair of leather boots. But leather is a delicate material, composed of collagen fibers that are sensitive to heat and moisture. When exposed to excessive or uneven heat, these fibers can break down, leading to irreversible damage: cracking, shrinking, discoloration, or even melting. This is where the choice between a household iron and a heat press machine becomes make-or-break.
Household irons are designed for fabrics like cotton, linen, or polyester—materials that can withstand fluctuating temperatures and manual pressure. Leather, however, requires precise control over three critical variables: temperature, pressure, and time. Heat press machines are engineered to deliver consistent, adjustable levels of all three, ensuring that the patch’s adhesive bonds securely to the leather without exceeding the material’s heat tolerance. In this guide, we’ll break down the science behind leather patch application, explain why household irons fall short, provide a step-by-step tutorial for using a heat press machine, and share expert insights to help you avoid common pitfalls.
II. Why Household Irons Are Dangerous for Leather Patches
To understand why household irons are unsuitable for leather, it’s essential to first recognize the unique properties of leather. Unlike synthetic fabrics, leather is a natural material whose structure relies on the integrity of collagen fibers. These fibers are held together by hydrogen bonds, which break down when exposed to temperatures above 140°C (284°F), causing the leather to shrink, harden, or crack. Household irons lack the precision and control needed to protect these fibers while activating the patch’s adhesive. Below are the three primary reasons why household irons should never be used for leather patch application:
2.1 Uncontrolled Temperature: The Primary Risk to Leather
Most household irons have basic temperature settings (e.g., “cotton,” “silk,” “wool”) but lack the ability to set or maintain a precise temperature in the range safe for leather. Leather typically tolerates temperatures between 120°C and 140°C (248°F and 284°F), depending on the type (e.g., full-grain vs. suede). A household iron’s “low” or “silk” setting may still exceed this range—especially if the iron is old, poorly calibrated, or takes time to cool down after being used on a higher setting.
Excessive heat causes leather fibers to shrink and harden, leading to cracking or peeling. For example, a standard household iron set to “cotton” can reach temperatures of 180°C to 200°C (356°F to 392°F)—far above leather’s tolerance. Even brief exposure to these temperatures can permanently damage the leather’s finish: glossy leather may become matte or bubbled, while dyed leather may bleed or fade. Additionally, household irons heat unevenly—hot spots near the soleplate’s edges can cause localized damage, even if the overall setting is “low.”
2.2 Inconsistent Pressure: A Barrier to Secure Adhesion
Patch adhesion relies on uniform pressure to ensure the heat-activated adhesive bonds fully with the leather’s surface. Household irons rely on manual pressure, which is inherently inconsistent. When you press an iron onto a patch, you may apply more force to some areas than others—leading to uneven adhesion. Areas with insufficient pressure will have loose, bubbly patches that peel off easily, while areas with excessive pressure can crush leather fibers, leaving permanent indentations.
Another issue with manual ironing is movement: it’s nearly impossible to hold an iron perfectly still for the 10–15 seconds needed to activate the adhesive. Sliding or shifting the iron can disrupt the adhesive bond and scratch the leather’s surface, especially on smooth or polished leather.
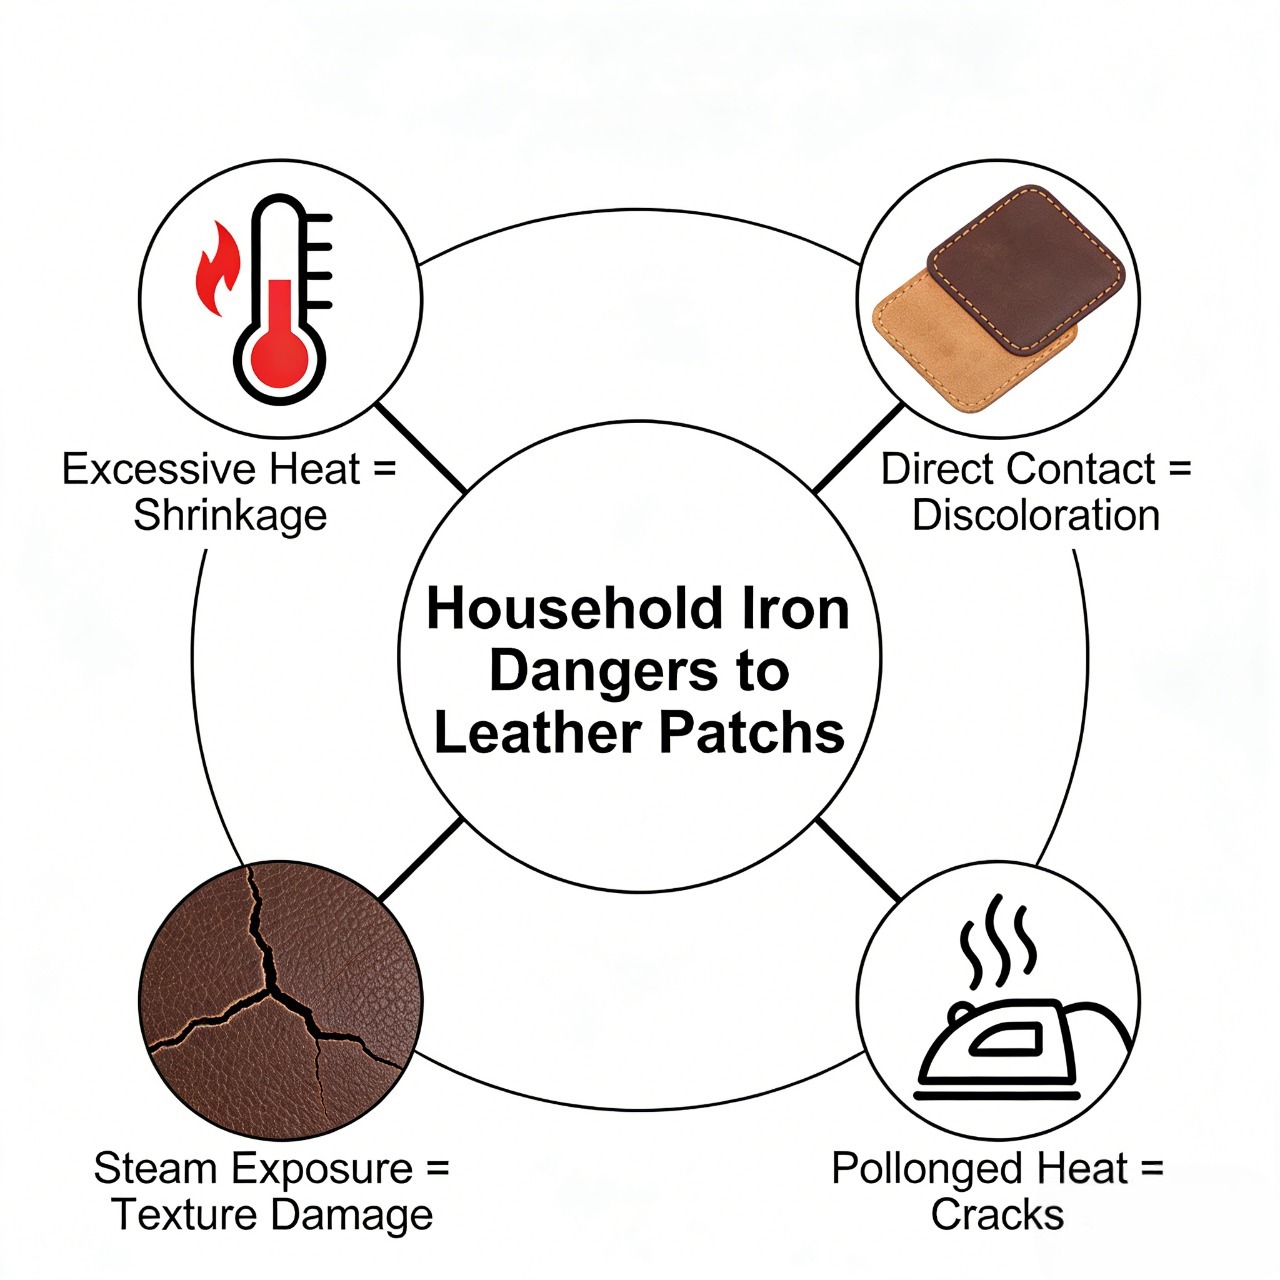
2.3 Lack of Heat Insulation: Amplifying Damage Risks
Heat press machines are designed to work with heat-resistant mats or pads that insulate the leather and distribute heat evenly. Household irons, however, offer no such insulation. When you iron a patch directly on leather, the heat transfers not just to the patch but also through the leather to the underlying surface (e.g., a table or ironing board). This can cause the leather to absorb excess heat from both sides, increasing the risk of shrinkage or discoloration.
Additionally, ironing boards are often covered in fabric that can trap moisture—another enemy of leather. Moisture combined with heat can soften the leather excessively, leading to warping or mold growth over time. Heat press mats, by contrast, are made of moisture-resistant materials (e.g., silicone or Teflon) that protect the leather while ensuring optimal heat distribution.
2.4 Visual Comparison: Heat Press vs. Household Iron
The differences between heat press machines and household irons in leather patch application are stark. The chart below summarizes their performance across the critical variables of temperature control, pressure uniformity, heat distribution, and leather safety:
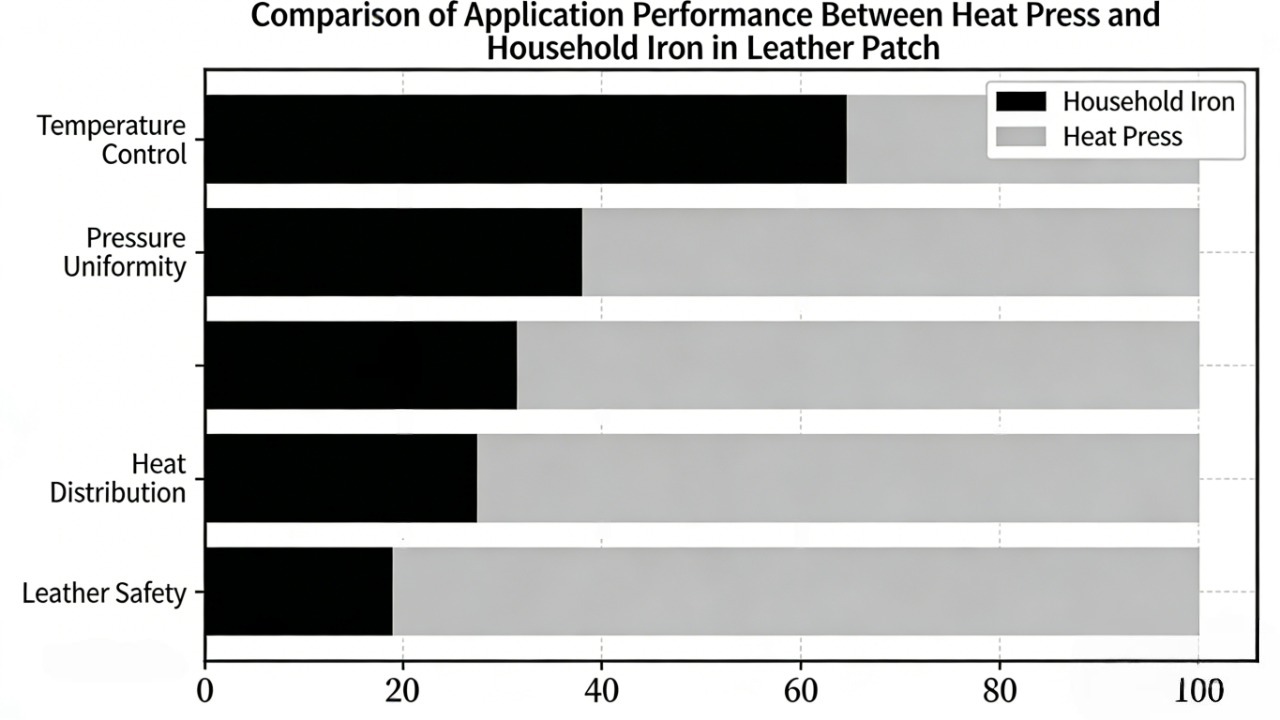
As the chart illustrates, heat press machines outperform household irons in every key category. Their ability to maintain precise temperatures, deliver uniform pressure, and distribute heat evenly makes them the only safe choice for leather patch application.
III. How to Apply Patches on Leather with a Heat Press Machine (Step-by-Step)
Using a heat press machine to apply patches on leather is straightforward—if you follow the correct steps. Proper preparation, accurate parameter settings, and careful execution are key to achieving a secure, damage-free bond. Below is a detailed, step-by-step tutorial:
3.1 Preparation: Lay the Groundwork for Success
Preparation is critical to avoiding mistakes. Start by gathering the necessary tools and materials, then prepare both the leather item and the patch for application:
-
Choose the Right Patch and Adhesive: Not all patches are suitable for leather. Opt for patches with heat-activated adhesive specifically designed for leather or synthetic leather. Avoid patches with solvent-based adhesives, which can dissolve or damage leather fibers. Silicone, TPU, or heat-resistant embroidered patches are ideal—they can withstand the 120–140°C temperature range without melting. If you’re creating custom patches, ensure the adhesive layer is at least 0.5mm thick for optimal bonding.
-
Gather Tools: You’ll need:
-
A heat press machine (clamshell or swing-away models work best for small to medium leather items; roll heat presses are better for large items like leather jackets).
-
A heat-resistant silicone or Teflon mat (to place under the leather).
-
Leather cleaner or rubbing alcohol (to remove dirt, oil, or debris).
-
Lint-free cloths (for cleaning).
-
Tweezers or a small spatula (to position the patch accurately).
-
A thermometer (optional, for calibrating the heat press).
-
-
Clean the Leather Surface: Dirt, oil, or wax on the leather will prevent the adhesive from bonding. Wipe the target area with a lint-free cloth dampened with leather cleaner or rubbing alcohol. Avoid harsh chemicals (e.g., bleach or acetone), which can damage the leather’s finish. Allow the leather to dry completely (5–10 minutes) before proceeding—moisture will interfere with heat transfer.
-
Test on a Hidden Area: Always conduct a test on an inconspicuous part of the leather item (e.g., the inside of a jacket sleeve or the bottom of a bag). Cut a small piece of the same patch material and apply it using your planned temperature and time settings. After cooling, check for damage (e.g., discoloration, shrinking) and ensure the adhesive bonds securely. Adjust the settings if needed.
3.2 Set the Heat Press Parameters: Tailor to Your Leather Type
The key to success is setting the right temperature, pressure, and time. These parameters vary based on the type of leather—always prioritize the leather’s tolerance over the patch’s instructions. Below are recommended settings for common leather types:
|
Leather Type
|
Temperature (°C)
|
Pressure (PSI)
|
Time (Seconds)
|
|---|---|---|---|
|
Full-Grain/Smooth Leather
|
145–155
|
35–40
|
12–15
|
|
Suede/Nubuck
|
150–160
|
25–30
|
10–12
|
|
Genuine Leather (Thin)
|
155–160
|
30–35
|
10–12
|
|
Synthetic Leather (PU/PVC)
|
150–155
|
30–35
|
8–10
|
Note: PSI (pounds per square inch) is the standard pressure measurement for heat presses. If your machine uses kg/cm², convert the values (1 PSI ≈ 0.07 kg/cm²). For example, 35 PSI ≈ 2.45 kg/cm².
3.3 Application Process: Execute with Precision
Once you’ve prepared the leather and set the parameters, follow these steps to apply the patch:
-
Preheat the Heat Press: Turn on the machine and allow it to reach the target temperature. This usually takes 5–10 minutes. Use a thermometer to verify the temperature if your machine’s display is uncalibrated.
-
Position the Leather and Heat-Resistant Mat: Place the heat-resistant mat on the heat press’s lower platen. Lay the leather item on top of the mat, ensuring the target area is flat and wrinkle-free. If the leather is curved (e.g., a bag handle), use a heat press pillow to fill the curve and keep the surface even—uneven surfaces lead to uneven pressure.
-
Position the Patch: Use tweezers or a spatula to place the patch on the target area. Double-check the alignment—once the adhesive is activated, the patch cannot be repositioned. For complex designs, mark the leather lightly with a pencil (test the pencil on a hidden area first to ensure it doesn’t stain) to guide placement.
-
Apply Heat and Pressure: Lower the heat press’s upper platen onto the patch. Ensure the platen covers the entire patch—if the patch is larger than the platen, use a heat press with a larger platen or apply the patch in sections (avoid overlapping heated areas). Activate the machine to apply the set pressure and time. Do not open the press early—premature removal will disrupt the adhesive bond.
-
Cool and Inspect: Once the timer ends, open the press and allow the patch to cool completely (5–10 minutes). Do not touch or move the patch while it’s hot—hot adhesive is soft and can shift. After cooling, gently tug the edges of the patch to test adhesion. If any edges lift, reapply heat and pressure for 2–3 seconds (avoid overheating).
3.4 Post-Application Care: Protect Your Work
After applying the patch, take these steps to ensure the bond lasts and the leather remains in good condition:
-
Clean Excess Adhesive: If any adhesive seeps out from the patch’s edges, wipe it away with a lint-free cloth dampened with leather-safe solvent (e.g., isopropyl alcohol). Do not use acetone or nail polish remover—these will damage the leather.
-
Avoid Water for 24 Hours: Do not clean or get the leather wet for at least 24 hours after application. Water can weaken the adhesive bond before it fully cures.
-
Store Properly: Store the leather item in a cool, dry place away from direct sunlight. Sunlight and heat can fade the patch and damage the leather over time.
IV. Key Tips for Success: Expert Insights to Avoid Common Pitfalls
Even with the right tools and steps, small mistakes can compromise your patch application. Below are expert tips to help you achieve perfect results every time:
4.1 Understand Leather Type Nuances
Different leather types require different approaches:Full-Grain Leather: The most durable leather type, full-grain leather can withstand slightly higher temperatures (130–140°C) and pressure. Its rough surface provides excellent adhesion—no additional preparation is needed beyond cleaning.Suede/Nubuck: These porous leathers are more delicate. Use a lower temperature (120–130°C) and place a thin Teflon sheet between the heat press platen and the patch to protect the nap (the fuzzy surface). Avoid excessive pressure, which can flatten the nap permanently.Synthetic Leather (PU/PVC): Synthetic leather is prone to melting at high temperatures. Stick to the lower end of the temperature range (120°C) and reduce the time by 2–3 seconds. Test on a hidden area first—some low-quality synthetic leathers may still discolor.
4.2 Choose the Right Heat Press Model
The size and type of heat press machine matter: Clamshell Heat Press: Ideal for small to medium items (e.g., wallets, small bags, boot toes). It’s compact and easy to use, making it a good choice for beginners.Swing-Away Heat Press: Better for larger or curved items (e.g., leather jackets, tote bags). The upper platen swings away, allowing easy access to the item and reducing the risk of burning yourself on the hot platen.Roll Heat Press: Designed for large, flat items (e.g., leather panels, coats). It applies heat and pressure evenly across large surfaces, making it ideal for commercial use.
4.3 Don’t Overlook Adhesive Quality
The patch’s adhesive is just as important as the heat press. Look for adhesives labeled “leather-specific” or “heat-activated for natural materials.” Avoid cheap, generic adhesives—they may not bond securely or may damage the leather. If you’re making your own patches, use a heat-activated adhesive film (e.g., 3M Scotch-Weld) designed for leather.
4.4 Avoid Repeated Pressing
Each time you press the leather, you risk damaging the fibers. If the patch doesn’t adhere properly on the first try, adjust the settings (e.g., increase temperature by 5°C or time by 2 seconds) and try again—but limit this to one additional press. Repeated pressing can cause the leather to shrink or harden.
4.5 Handle Wrinkled Leather Carefully
If the leather is wrinkled, do not iron it to smooth it out. Instead, use a leather steamer on the lowest setting to relax the fibers. Hold the steamer 6–8 inches away from the leather (do not touch the surface) and allow the leather to dry completely before applying the patch. Steam is gentler than direct heat and won’t damage the leather.
V. Conclusion: Embrace the Heat Press for Perfect Leather Patches
To answer the original question: Yes, you can apply patches to leather—but forget about household irons. These tools are too imprecise, inconsistent, and risky for delicate leather fibers. A heat press machine, with its precise temperature control, uniform pressure, and heat distribution, is the only way to achieve a secure, damage-free bond.
By following the steps outlined in this guide—preparing the leather and patch, setting the correct parameters, and executing the application with care—you can personalize or repair your leather items with confidence. Remember to tailor your approach to the type of leather, choose high-quality patches and adhesives, and test on a hidden area first. With the right tools and techniques, your leather patches will look professional and last for years.
Whether you’re a hobbyist personalizing a leather jacket or a business adding logos to leather products, the heat press machine is an investment worth making. It eliminates the risk of damage, ensures consistent results, and opens up endless possibilities for customizing leather goods. So, put away the household iron—and let the heat press do the work.


PEPHAWK is proud to highlight our integrated one-stop service—seamlessly combining professional design, R&D, and manufacturing capabilities to deliver cohesive, end-to-end solutions for our valued clients.
Our core product range covers a diverse selection of high-quality accessories and silicone-based items, including:
- Garment Accessories: Silicone Labels, Micro Fiber Labels, TPU Labels, Leather Labels
- Electronic & Lifestyle Gadgets: Silicone Mobile Phone Skins, Silicone MP3 Skins, Silicone Chaplets, Silicone Bracelets
Beyond our core offerings, we also connect clients with complementary products through our trusted affiliated companies, ensuring all your needs are met under one partnership.
What sets us apart is our specialized expertise in key manufacturing processes: Silk Screen Printing, High-Frequency Welding, Sublimation Printing, Seamless Fabric Processing, and Laser Cutting. These capabilities allow us to serve a wide array of industries—from garments, shoes, caps, and gloves to electronic devices, bags, and sporting equipment—with products that blend durability, functionality, and aesthetic appeal.
At PEPHAWK, customer satisfaction is our top priority. We’re committed to providing responsive, thorough support, and guarantee a same-day response to all inquiries—no exceptions. You can rely on us for consistent quality, reliable delivery, and a partnership that’s as efficient as it is trustworthy.
Whether you’re looking for custom apparel labels, protective silicone skins, or tailored manufacturing solutions, PEPHAWK has the expertise and flexibility to bring your vision to life.
Anime Iron-On Patches: Doraemon, Gengar, Pony — the Art of Personalized Fashion
Clear Clothing Labels: Invisible Elements That Puts Your Brand Front and Center




SEND MESSAGE